Tuesday, August 17, 2010

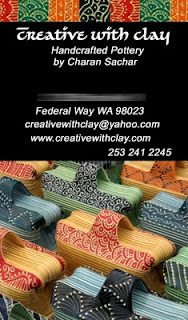
Winner of Business Card Design

Firstly I would like to thank each and everyone of you who provided input on my business card designs. I wouldn't have been able to look into all the aspects of it just by myself.

The votes for the vertical and horizontal were really 50/50, each with its pros and cons, so it was a tough decision for me.

Even though I liked the vertical more when I posted the two designs, I have gotten convinced to go with the horizontal design with the input I have got from all of you.

The vertical had many challenges.
Firstly the font of my information gets reduced and if the purpose of a business card is to communicate your contact info, it should be clearly visible.
Several mentioned about it not having a conventional convinient way to store and look up.

Even though the detail of my work was very visible, I have noticed that several people don't recognize the picture of my butter dishes. It is eye catching, but several ask me.."What is that?" And with the sculpture picture behind, my functional work is not showcased very well.

To remedy that I tried including a few more pictures of my work in the vertical design, but the orientation just didn't work. Everything got too tiny when I looked at a printout.

I tried front horizontal and back vertical, and that felt like there is an error in printing the cards.

So I am going with the horizontal design.
I moved around my addresses and website, so the info side looks more balanced.

Made changes in the images.
Removed the Black background and went with a gradient instead.
Here is the final design.
(Blurred area is where my physical address goes)


The winners picked at random for the business card design are
Jim Bob Howard
Cara Zavisho and Ben Trask

Saturday, August 14, 2010

Business Card Design

I need your help again! I am designing my new business card and need your opinion.
The ones which I have are not that great and this time I wanted them printed both front and back.

Another thing I wanted to try was doing a vertical orientation.

And there is something for you to gain in this too. Please comment in whether you would like Vertical or Horizontal design and also tell me why. And if you would change something what would it be.

Two random people will be chosen to receive my heart shaped pendant (See picture below). So this is a Win-Win situation!

Winner will be announced on Tuesday August 17th, so start posting your comments!
I really appreciate your inputs!
PS: Blurred area is where my address will appear.
Vertical Option:


Horizontal Option:


Sunday, August 1, 2010

Coconut Cake


Every now and then I get into baking/cooking mode. It had been a while since I baked a cake, so decided to make a simple coconut and cherry cake.


Here is the recipe
6oz butter
3/4 cup sugar (I have reduced this from 1 cup, because I don't like extra sweet cakes)
1 1/2 cup flour
1 tsp baking powder
3 eggs (beaten)
1/2 cup dessicated cocunut
1/4 cup cherries chopped
1/2 tsp vanilla essense (opt)
3-4 tbsp milk

Cream the butter and sugar till pale and fluffy.
Graudually beat in the eggs + vanilla essense.
Fold in the sifted flour+bk pwder
Fold in the cocunut with teh cherries.
Add milk to get to dropping consistency
Bake at 350 for 1/2 hour our till a tooth pick comes out clean.

Enjoy!

Sunday, July 11, 2010

Making pedestals for art shows

If you are an artist and have been doing art shows, I am sure the thought of displays is always in your head.
I have been working on my booth displays and always changing something. Sometimes with the introduction of new items, things need to be rearranged and I need to change the way I set up my shelves.
Pedestals is something I always struggled with for my sculptures and for my few featured items. There are several designs out there. There are expensive options which do look really nice. Some can be bulky, some can be flimsy, some don't last long at all and some take forever to assemble.
One method that worked well for indoor shows was painted cardboard. It looked clean and sturdy but it really wasn't very stable. I took them to one outdoor show where it rained like crazy and that was the end of them. You can see them in the picture below.
I then came across potter Kathleen LeSueur and she does amazing work. She mentioned about her pedestals made from 1/8" luan and outdoor carpeting which she had been using since 1994. So using her design and adding a few more additions, I made my pedestals and love the way they came out. They were not very expensive to make either. Hope the following steps help. Thanks Kathy for pointing me to the right direction.
First cut four pieces from 1/8" luan for the four sides of the pedestals (eg. four pieces of 8"x 25"). I got this cut at the big box store itself, as I don't have a table saw and their cuts were very accuarte. I think I paid $2.00 for cutting up sides for all the 3 pedestals I made. Worth it!
Then you cut the outdoor carpeting to dimentions slightly larger than what you would need for the pedestal (For the 8"x25" sides, cut the carpeting to 36"x 28")
Glue the luan with carpet glue to the back side of the carpeting leaving a 1/4" gap between each side. Once the glue is set, cut off the remaining from the top and bottom, but leave 3-4" exra on the side.

Between the middle two panels I added a strap of carpeting with staples to serve as a handle for carrying them.

To set it up, just set it upright and use velcro strips which grip on very well to the carpet. I then added two 2" square styrofoam pieces to help square the top and bottom.

Another piece of laun covered in outdoor carpeting and you are done. I have used these for 3 shows so far and they are really holding up very well. I am sure they will last a long time. You can see them in action at my next show. Gig Harbor Summer Art Festival
If you have any more ideas, feel free to comment.

Bookmark and Share

Sunday, June 27, 2010

Color Feature of the Week: Peach

Last week we had 900+ views!!
This week the featured color is Peach and Thank you all for submitting your work. 8 talented sellers have been chosen. Click on the pictures and do check out their amazing shops.


If you would like to enter for a Color Feature on my blog

You have to do the TWO steps to be considered

1. Leave a comment on this blog with your favorite items from this week's feature

AND

2. Post your item matching next week's color, "RED WHITE AND BLUE" (Color swatch below) in this ETSY FORUM


Monday, June 14, 2010

Color Feature of the Week: Black

Last week we had 900+ views!!

This week the featured color is Black and Thank you all for submitting your work. 8 talented sellers have been chosen. Click on the pictures and do check out their amazing shops.


If you would like to enter for a Color Feature on my blog

You have to do the TWO steps to be considered

1. Leave a comment on this blog with your favorite items from this week's feature

AND

2. Post your item matching next week's color, "PEACH" (Color swatch below) in this ETSY FORUM


Bookmark and Share

Thursday, June 10, 2010

Travel Entry: Chatuchak Market in Bangkok

Another place we visited during our vacation was Bangkok. We spent 10 days there and it was just amazing. It is sad to see the current conditions of Bangkok. Everything was so different a few months back.
Anwyays, one of my favorite places we visited in Bangkok was the Chatuchak Market. It is kind of a flea market but with a lot of beautiful handcrafted work. The celdon glazed work below just blew my mind away. I wish I had purcahsed something, but the logistics of travelling with pottery didn't work out. I love the balance of the tan carving with the soft green celedon glaze.

These metal decorative vessels caught my attention. They were extremely thin with beautiful intrictae carvings. The insides were lined with gold paint and with tealight candles floating, they made a stunning impression.

I have always admired the wood carvings at Thai resturants here in the US. It was a delight to see such a huge collection of these at this Market. The details are hard to describe. Evey leaf can be admired by itself.

Wonder what to do with those large plastic soda bottles? Check out the lamps below. The work is so clean and it took me a while to figure out they were soda bottles.

And the following picture had us laughing for a long time. What you see below are toilet paper dispensers. It is a fine line between being repulsive and funny. LOL!

The dance of pulled coffee drinks. This was just a joy to watch. The coffee drink was mixed by transfering from one cup to the next with the guy swirling around, turning and doing all kinds of stunts. All to mix coffee.

And there is nothing like having fresh coconut icecream on a hot day and that too served in cocunut shells.


Bookmark and Share

LinkWithin

Related Posts Plugin for WordPress, Blogger...