Tuesday, April 26, 2011

Extruded and Pulled Handles

As potters know, a comfortable and aesthetically balanced handle is a goal we all strive for. And for many it is a dreading part of the whole process. It is a constant learning process and now I actually enjoy pulling handles. I have kept experimenting and changing my handles to get them consistent and the shape that I want.


Since I love my extruder so much, potters at shows and online always ask me if I pull or extrude my handles. Well.. I do both. I extrude mostly for getting a consistent shape for all my handles and also it is a lot faster. But plain extrusions and result in a very lifeless handles. So then I go ahead and pull my handle.


I cut my oval shape extrusions to 5" in length. To make this a more pleasurable experience, you clean warm water for pulling. My left hand is always dry to hold the handle. Dip the handle in water and taper it with your right hand.


After tapering, I run my thumb in the center a few times to create a curve. When finished, this slight curve makes a good place for the thumb to rest.

Check the video below to see the whole process. When attaching the handle to the mug, I cut with a cookie cutter as this lets me join the mug to the curved surface of the mug without distorting it. I got that tip from Ginger Steele on one of our clay play dates.


And here is the finished result.


Below are pictures of pots from Ginger Steele and Kristen Kieffer whose handles I really admire.
Feel free to add your tips on handles in the comments.

Sunday, April 24, 2011

Mother's Day Sale

The one thing that my mom loves is a good deal! And I am sure there are many like her.

So if you haven't shopped for your mom yet, this is a great opportunity to make her proud with a good discount.

Purchase any item in my shop and get 25% OFF shipping.
Any two items and you get 50% OFF shipping
Any three items and get 75% OFF shipping
Any four or more items and absolutely FREE shipping.


Just mention "Mother's Day discount" in Message to Seller when you purchase.


Discounts will be given as refunds via paypal as soon as payments are made.
Items will be shipped via USPS Priority Mail or Fedex ground.


Act fast as this deal only lasts till May 2nd, to ensure that your gifts reach in time for Mother's Day!

Thursday, February 17, 2011

Soap Dishes with New Recycled / Upcycled Glaze

I have been making soap dishes for a long time now and I love their simple design and at the same time they are very practical.
The deep grooves help keep the soap high so it drains and dries the soap well. They have very smooth glossy glazes which makes them very easy to clean. And if you love automation, just stick them in the dishwasher to clean them. :)
And the feedback I have got for these is just amazing. Custmers love them and keep coming back for more.. either for their other bathroom, kitchen or as gifts. Read through some of the feedback I have gotten with pictures sent by my happy customers.


"Well made, sturdy, great design and functionality. I love the two tone veriation that looks great with the tub and am so glad I got two for my master bathroom!"
"Wonderful product!!! So well made and generously-sized, these soap dishes are more like beautiful piece of art. Seller was great to work with - attentive and responded quickly to my request. Highly recommend!"
"Love my soap dish! I used it today for the first time. Awesome quality! Quick shipping. Arrived safe, all in one piece.I will definitely be purchasing more from this artist!"

The main reason of writing this post is that I am introducing a new glaze color for my soap dishes. And it is just not a new glaze recipe.. it is very special. While working in the studio and clean up glazes, I always saved up the glaze which came from spraying glazes or cleaning pots. To this I also added glazes that I wasn't using any more. Rather than just dumping this in the environment, I tested and tweeked it. Low and behold, I have this beautiful deep blue grey glaze which has some specks of brown. I looks beautiful over the white glaze and also has some white specks in it if you look closely.


I cannot replicate this glaze ever, but I have 5 gallons of it. So I should be able to make several soap dishes.
So don't waste your glazes. Mix them up and see what you get.
I would love to hear what waste material artists recycle in their studio and upcycle it to create truely unique work.

Monday, February 14, 2011

Pushing the limits

If you have been following my blog and my work, you would have noticed that I have a big fascination for patterns and textures. The patterns on my work can get detailed but I felt I could push my slip decorating skills further. I always wanted to try the hanna patterns applied to the hands of the Indian bride.

I started with this platter for which I made a floral pattern inspired by Arabic henna designs. I love the flow of the pattern with the shape of the platter.

I got great feedback on facebook with that platter and wondered, "Can I push myself further?"
So, I took a slab of clay (16x12 inches), put some lines on it as general placement of my pattern and went to town with it. I spent my entire Sunday doing this, so it did take me forever.
I will make a textured mat with this, so I can redo this pattern on other pieces of my work. I still have to figure out how that is going to work.
This might be moving my work in a new direction and hope it is a good one.


Wednesday, February 9, 2011

Sponges Sponges Sponges

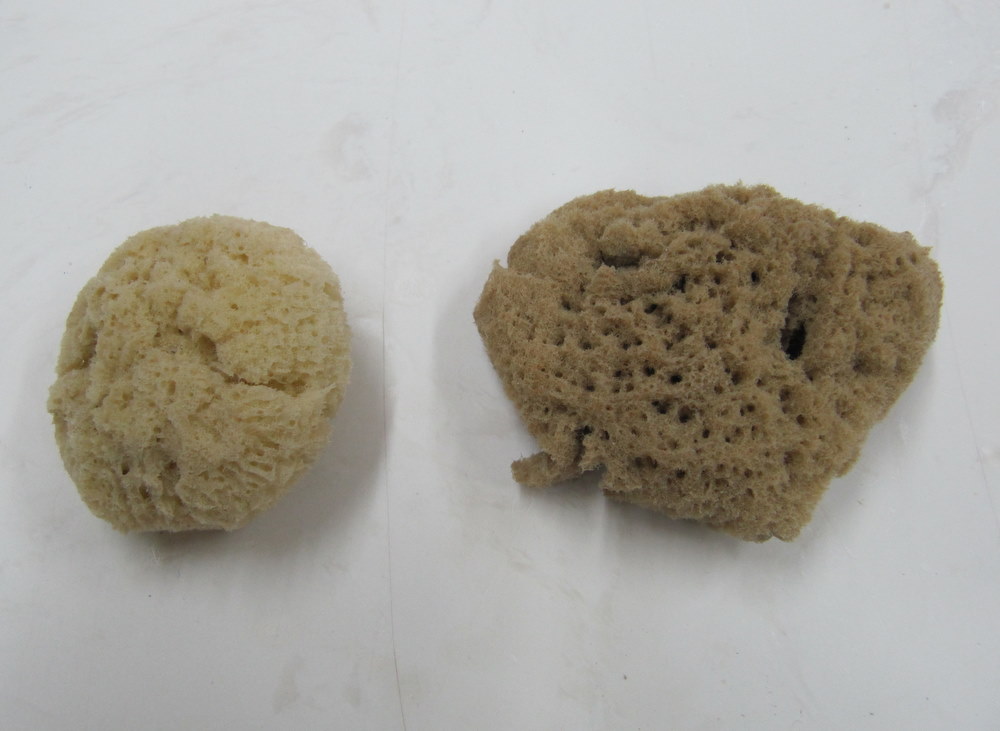
As a potter, I have to admit, I have weird relationship with sponges. Still trying to find the perfect one and it is just never satisfactory. Here are the pictures of some that I use and some that were rejected at first use. Would love to hear your insights.

Firstly, the standard yellow sponge. They come round, but are too big and hold a lot of water. So I cut them. Inexpensive but especially after cutting them I need to watch out for the yellow bits in my clay while throwing. Though this does make a good cleaning sponge for wiping off glaze from the bottom of pots while galzing.


The elephant ear sponge. These I like. Can hold a lot or little water depending on how much you squeeze out. They are on the expensive side. They do last longer though. But $5 for sponge.. I don't think so...


This is some sort of elephant sponge which I used once and never used again. It is flat and doesn't absorb any water. Nothing good to say about this one other than its shape and size.


Then there is the mudtools sponge. It is cut in half and has been used quite a bit. Holds decent amount of water but I find it very textured. Pricey too.. $6 I think.


One of my favorites... from the Dollar store. I get four big rectangle sponges for a Dollar. And I make 5 sponges from each of them. So that is 20 sponges for a dollar. They don't feel great on first use, but after that they become flat (picture on the right) and hold just the right amount of water. Surprisingly they last longer too.


This is my recent find. Cosmetic sponges. They are cut to the perfect size and shape that I need. Hold perfect amount of water. I think I paid $3 for 20 sponges in a bag. They are great for cleaning up glazes in tight corners too like lid galleries. Let's see how long this affair lasts.


I would love to hear about your tools and what works for you. Post away!

Sunday, January 30, 2011

When Potters Play Together

... we sure can have fun.

It is always a joy meeting other potters and chatting about pottery. We all lead pretty busy lives but it is great to hang out in the studio with another potter. I have been fortunate to hang out in Ginger Steele's studio from time to time. After the Christmas season was over, I made a trip to her studio in Oregon and we experimented with making sculptures constructed with coils.

Check out Ginger's cookie jar with the dog head. I am too embarrased to show what I made. It was a pretty saucy diva sculpture which unfortunately cracked on my trip back home. In any case it was fun and a good exercise.


A week back, Ginger visited our home and our goal was just to play in clay. We extruded some of my pillow shapes and this what Ginger made out of one of them.


I wanted to make some rectangular trays and she helped me make a plaster mold for that and I love the way the tray came out. Look out for these in my shop in the near future.


Ginger liked my extruder dies and had a design in mind for oval casseroles. We went through the process of designing it and I made the die for her which worked like a charm. Here is the casserole I made with that die. I am waiting to see what Ginger makes with that die in her studio.

It was time to spice up Ginger's Etsy shop. So we took pictures of her pots. I showed her how to edit them using picassa for Etsy and we listed her pots. Check out her shop. Really lovely work.


We had a great time and are looking forward to the next time we can play together.

Monday, January 17, 2011

A Great Wedding Gift!


It always thrills me more when people buy my work as gifts. One can always spend money on themselves, but when they spend it for someone else, it shows they have confidence in their purchase and the the receiver is going to love them.

And of course it is great when people combine different items as gifts. This last order was just the perfect gift for a wedding. Sugar creamer set, a butter dish and salt pepper shakers.

Wouldn't this be just great for a wedding gift? Other popular items in my shop for gift are my Oil vinegar bottles, teapots, set of mugs.

Best wishes to everyone receving these gifts!

LinkWithin

Related Posts Plugin for WordPress, Blogger...